
My ten year old nephew has very limited vision and, as often curious children do, he made a very simple request to his mum for a "talking temperature guage, please". "We'll ask your Uncle Leigh", was my sister's reply. Shortly thereafter, I was visiting Australia for my father's 70th birthday and spent some time with my sister and nephew, Tom. "Uncle Leigh! Mummy said to talk to you about a talking temperature guage", exclaimed Tom. Oh dear, said I, knowing this could get complicated
My sister explained to me that Tom has trouble reading the temperature and, being fascinated with alternate measurement scales at the moment, he wanted a talking temperature guage that spoke the current temperature in Fahrenheit, rather than Celcius (Celcius is the norm for Australia). After a bit of googling, I came to the conclusion that anything I could buy online would be rubbish and probably not good enough for my dear nephew Tom. So I made the promise to do some research and see if I couldn't build one for him (having recently read an article on Arduino)...
Commitment
Well, what can I say, I probably bit off more than I could chew (at the time) but I struggled through and managed to get it all together - and now I present, the worlds most expensive, personalised, talking temperature guage. Featuring the voice of ABC Television Queensland's weather presenter, Jenny Woodward, Tom's favourite TV personality... Credit to my sister for pulling that one off - and thanks to Jenny and her colleague Kieran Gray for recording all the voice prompts required to play out the entire (reasonable) Fahrenheit temperature scale
Hardware Selection
I started prototyping the project on an Arduino Uno, but wanted to make the TTG somewhat portable - so I decided on using the Arduino Fio, which could be powered by battery and had an on-board charging circuit. It also ran at 3.3V, which was the same as some of the other components / circuits I had decided to use - so a perfect fit... I grabbed a 2000mAh single cell 3.7V LiPo battery from Amazon to complete the package.
Tom can see and read large red LED digits (like the ones on his CD music player) so I decided to incorporate a scrolling LED display so he could read along with Jenny's voice when he activated the TTG. I ordered the 4 digit 16 segment 1" tall red LED display (DSP-0401B_hw_v4) from Embedded Adventures - who, not only delivered quickly, but continue to provide support and encouragement to me on this project to this day
For the sound module, I did a lot of research and in the end selected the SoundOut Audio Module MOD-1007 from Embedded Adventures - a WTV020-SD based audio playback module compatible with the SOMO14D.
For the temperature sensor, I chose the DHT22/AM2302 Digital Temperature Humidity Sensor 3.5V-6V DC based on reviews and recommendations for simple Arduino programming - nothing but the best for young Tom - thanks Amazon!
I ended up needing a way to power an amplifier circuit to boost the sound volume and, rather than overloading the Fio, I decided to tap into the battery itself via the on/off pads on the Fio - so the amp would be powered on when the Fio was switched on and vice versa and charging would not interfere with either. To power the 5V amp circuit, I used a Pololu Adjustable Boost Regulator 2.5-9.5V. Nice bit of kit, that! I noticed today that Embedded Adventures now have a nice module that does the same thing... for half the price - d'oh! >.<
Prototyping
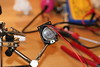
I set out and before too long I had a breadboard setup and the Uno talking to both the LED display and the SoundOut module. Result!
[BBvideo 425,350]http://www.flickr.com/photos/allandrick/8510527647/[/BBvideo] [BBvideo 425,350]http://www.flickr.com/photos/allandrick/8511640872/[/BBvideo]
I updated my code to do interrupt driven sound playout so that I could scroll text at the same time as playing audio:
[BBvideo 425,350]http://www.flickr.com/photos/allandrick/8510546531/[/BBvideo]
I reached an impasse with the Uno (a native 5V system) which was causing issues with the sound module and amplifier so I moved onto the Fio - very quickly we got to this stage:
[BBvideo 425,350]http://www.flickr.com/photos/allandrick/8511637256/[/BBvideo]
Taking Stock
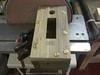
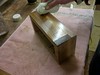
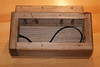
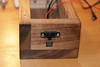
Needless to say, at this point the cost factor had blown out rather substantially - what with convincing myself that I needed two of every component so I could have a test unit here if anything went wrong with Tom's unit in Australia (so I could debug and troubleshoot remotely - hah!) - so I decided a simple plastic enclosure would just not do! I tried building one out of some spare soft timber I had lying around, but sadly the pine was too fragile and split in places it didn't need to while I was routing out the various holes it needed.
So off to the city timber merchant I went, seeking out hardwood. I came home with £40 worth of American walnut (!). I told you this was getting expensive
Enclosure Construction
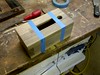
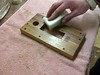
A few weeks later and after a lot of help from my friend Adrian Black (an awesome joiner / carpenter / all round handyman and mate) - and we had made a start with the enclosure:
Retro screws:
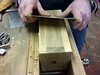
Aligning before sanding:
Smooth as a baby's ...:
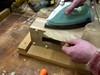
Getting some accidental grooves out with water, iron and wax paper:
Showing what the finish might look like with metho:
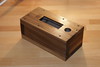
Adrian spent the next two weeks (while I was away for work) doing an awesome job of putting on as many coats of Ronseal Ultra Tough Hardglaze (polyurethane gloss) as he could - and tonight I picked up the finished product and started putting the electronics into the box. WOW! It looks awesome
Putting it Together
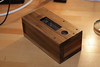
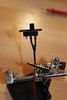
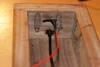
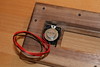
I bought a USB extension lead for the charger port on the Fio and mounted it in the enclosure:
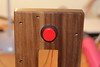
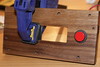
I then soldering leads to the various external components: power switch, push button and speaker:
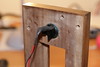
Next, I glued and screwed them into their respective positions in the enclosure:
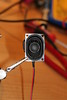
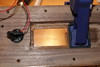
Next came the clear plastic window to protect the LED display:
and finally, the speaker in place:
To be Continued...
While waiting for glue to dry, I decided to start documenting the project - it has been a long time in the making, but it is finally all coming together!
Stay tuned for the next exciting update as I try to remember which pins connect to which components - hopefully it will all come together and work properly once inside the enclosure
