Page 1 of 1

My supercheap FPV setup for $120

Posted: Sun Feb 19, 2012 12:06 am
by erazz
Hey guys, just my first forrey into FPV. I figure I want the simplest and cheapest setup available.

What I want to do is to create a so called "back pack" that consist of a camera and a transmitter to mount on the plane. For the ground station I want to use a simple (read cheap 7" TFT lcd). That way I have a camera mounted on the plane that shows me simple, plain FPV. No OSD or GPS for the moment. As I go on I'll probably add those.

Plane will be the AXN floater from HK.
Radio gear will probably be a 9x with a FrSky setup. I say probably because I'm an optemistic person and there's always the possibility I'll win a million dollars, get bored and hack a multiplex unit. Not a large chance but a chance nontheless. :)

Here's my FPV setup:
Camera: Sony 420TVL HAD CCD. http://www.ebay.com/itm/New-420TVL-1-3- ... 19c999ca98
It's $20 - cheap.
Screen: http://www.ebay.com/itm/7-TFT-LCD-Color ... 2310e0b64b
%35 with shipping.
Wireless setup: http://www.hobbyking.com/hobbyking/stor ... duct=15295
$60 from HK.

Including shipping and all I'm at $120. Not bad for a first step.
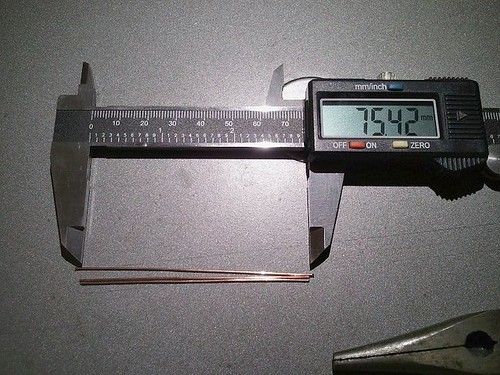
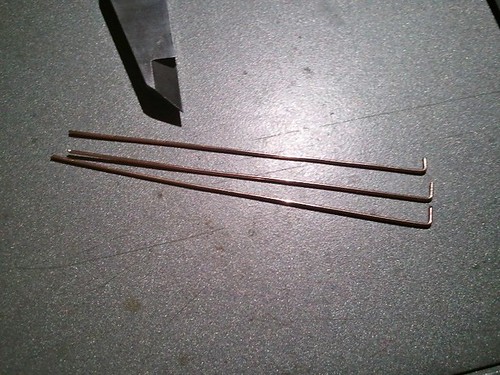
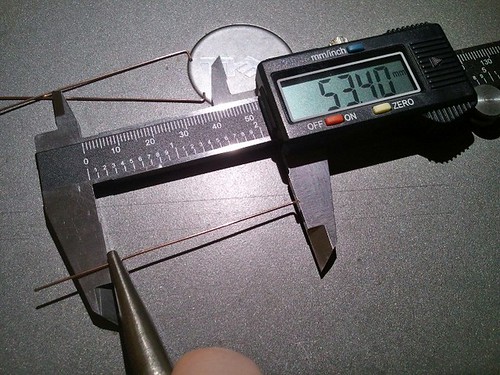
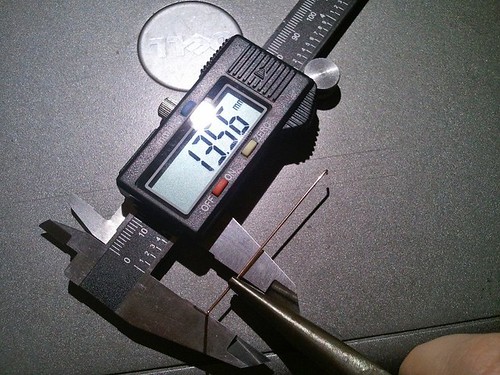
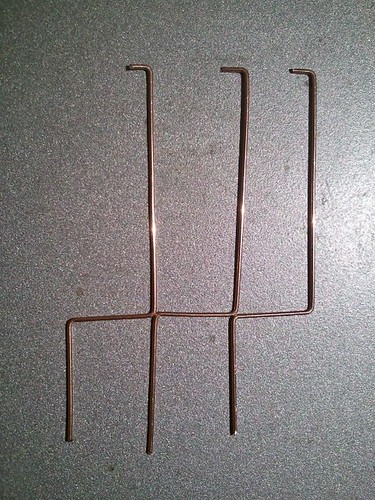
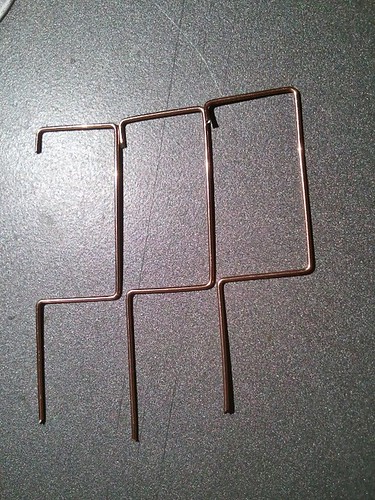
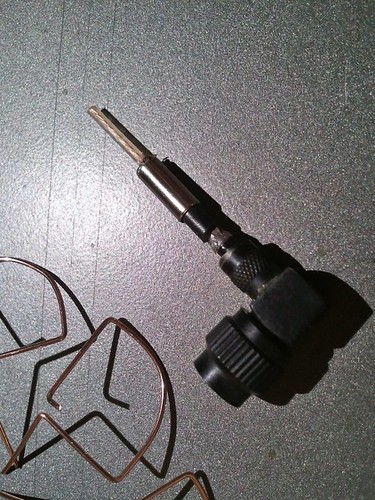
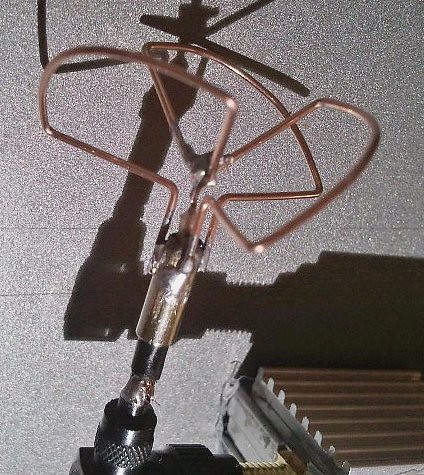
Next up will be my experimentation with antenna setups. Pictures to come!

Re: My supercheap FPV setup for $120

Posted: Sun Feb 19, 2012 12:14 am
by jhsa
Bruce has been working on a back pack.. Is yours the same?
João

Re: My supercheap FPV setup for $120

Posted: Sun Feb 19, 2012 12:16 am
by erazz
Very similar concept and execution.

Main differences are:
1) Mine is based on off-the-shelf components and so while being a bit more expensive it's much easier to source.
2) I don't hide my progress and tell others what I'm doing :)

My supercheap FPV setup for $120

Posted: Sun Feb 19, 2012 1:17 am
by cre8tiveleo
Too funny.

My fpv setup is EXACTLY the same. Just my monitor is a windows ce pmp with two video sources that can do pnp. (was my old gps system, coolnavi)

Same tx/rx, i made a camera mount out of old aluminum landing gear... :D

Re: My supercheap FPV setup for $120

Posted: Sun Feb 19, 2012 10:22 pm
by wheelspinner20
Erazz... have you seen this?? right up your alley. mine too...!

http://www.rcgroups.com/forums/showthread.php?t=1388264

Cheap to build, good performance. Several kinds of configs and how to's.

P.

Re: My supercheap FPV setup for $120

Posted: Mon Feb 20, 2012 1:08 am
by pldb64
More useful information on the IBCrazy antennae designs (both clover leaf and skew planar) here:

http://www.rcexplorer.se/page14/CPanten ... ennas.html

I believe this is the antennae design that Bruce is using on his backpack too.

Re: My supercheap FPV setup for $120

Posted: Mon Feb 20, 2012 1:44 am
by erazz
:)


That's the next step.

I have a laser welder at work - I'll try to find some music wire and make a super antenna!

Re: My supercheap FPV setup for $120

Posted: Tue Feb 21, 2012 3:08 am
by wheelspinner20
if .035 or .025 mig welding wire will help, I can send you a bunch.

P.

Re: My supercheap FPV setup for $120

Posted: Tue Feb 21, 2012 12:26 pm
by erazz
Thanks, I got a large reel too.

I'll probably buy a MIG welder just so I don't feel that I wasted my money :D

My supercheap FPV setup for $120

Posted: Tue Feb 21, 2012 12:40 pm
by cre8tiveleo
Cloverleaf antenna works like a charm, don't have a set yet, but some guys at our club do, and what a difference!


---
I am here: http://maps.google.com/maps?ll=44.003098,-79.457323

Re: My supercheap FPV setup for $120

Posted: Wed Feb 22, 2012 1:47 am
by wheelspinner20
I like your thinkin E, it's a very handy tool to have around. I would try and get a 220v one though. the 110 ones are not good for much more than sheet metal.

P.

Re: My supercheap FPV setup for $120

Posted: Wed Feb 22, 2012 2:17 am
by erazz
So, here's my crack at the antenna.

Impressions? I sat down kinda looking forward to doing it. A bit of relaxation while working. An hour and a half later sporting punctured fingers and croocked eyes I think I don't like these antennas so much... Good new is that if you work slowly and take care you stand a good chance of going crazy but producing a decent antenna.

Steps to build:
1) Go buy 0.8mm copper clad welding wire.
2) Release end from hole of reel.
3) Spend the next 20 minutes reeling back the uncoiled wire and cursing.

4) Cut 3 lengths of wire. They should be somewhat longer than 1 wave length (wl). Since I'm using 5.8Ghz, 1 wl = 52.6mm. I therefore cut 3 pieces that are 75mm long:
Image

5) Bend 3mm off the end - this will be used to "hook" the 3 wires together at the end.
Image

6) Measure 1 wl and add the wire's thickness.
1 wl = 52.6
1 th = 0.8
Bend at wl + th => 53.4mm
Image

7) It should look like this:
Image
(If it doesn't then give up and go do needle point. It get's harder!)

8) Measure out 1/4 wl (and add 1/2 th) -> 13.55 Bend again.
Image

9) It should look like this:
Image

10) And like this after another bend:
Image

11) Still having fun? Doing well? Don't worry, here's your chance to screw it up! Bend the middle piece so the two 1/4 lengths almost touch. Try to keep the angle of bend of th 1/4 lengths at 90 degrees. Sounds easy, no? Well, no. It really isn't easy to do properly and I think this is the first major pitfall.
Image

12) Still with us? Good. You'll make a good masochist. Now hold the base carefully with pliers and bend at 45 degrees. It really doesn't matter at what direction you bend as long as both the tx and rx antennae will be at the same direction. Trying to be clever I went for left hand polarization only to end up with right hand. Go figure.
Image

13) Here's a nice easy step for all you superstitious people. Take off the antenna's plastic cover. Easy. I do good destruction. I'm an engineer!
Image

14) Get out your "helping hands". No, not your wife, this gets hot. Ok, scratch that, you need it to be steady. Screw the antenna into the tx and tape it down. Hold one "petal" to the antenna and solder it into place. You can just "tack" it into place as once the top part is soldered it won't fall apart.
Image

15) Hook the top parts together around the stripped antenna wire (you did remember to strip the insulation, right?)
Once it's stuck together well you can fine tune the shape.
Image

Made it up to here? Good for you. Now you need to do it all over again (4 leaves this time) for the rx.
Who said this is a fun hobby?
:) :) :)

Re: My supercheap FPV setup for $120

Posted: Wed Feb 22, 2012 2:36 am
by pldb64
Here's a youtube video for the same construction

http://www.youtube.com/user/BMSWEB#p/u/4/FcAqiIKO2XI

Pardon the aussie accent ;-)

Re: My supercheap FPV setup for $120

Posted: Wed Feb 22, 2012 2:37 am
by wheelspinner20
Spend the next 20 minutes reeling back the uncoiled wire and cursing.
Ok, try this with a 60lb. reel, on top of a 10ft ladder.!!! same thing you just curse more! LOL


Looks good though, he has alternative styles that I think work better for the ground station, but I didn't understand them.

Re: My supercheap FPV setup for $120

Posted: Wed Feb 22, 2012 3:28 am
by erazz
Yeah, I'm using a Skwe-Planar (4 leaf) design for the receiver.

Re: My supercheap FPV setup for $120

Posted: Wed Feb 22, 2012 3:37 am
by erazz
pldb64 wrote:Here's a youtube video for the same construction

http://www.youtube.com/user/BMSWEB#p/u/4/FcAqiIKO2XI

Pardon the aussie accent ;-)

You make it look so easy :oops:

Re: My supercheap FPV setup for $120

Posted: Wed Feb 22, 2012 3:48 am
by pldb64
I can't claim the credit ... but yes - i suspect the author makes it look easier than it may be in practice ... but it was his second attempt and we don't know how many out-takes there were :-)

Re: My supercheap FPV setup for $120

Posted: Wed Feb 22, 2012 3:56 am
by GrootWitbaas
Yea he makes it look easy, but that's because he skipped the most important step no 3 :D

Re: My supercheap FPV setup for $120

Posted: Sun Mar 18, 2012 10:02 pm
by kaos
Not an engineer here. A couple of questions.
1> Does the length of the remaining coaxial matters?
2> It seems to me the 3 or 4 clover leaves are pretty easy to be changed in related angles during transportation. almost need to be pampered for transportation. Does polyurethane interfere with Tx or Rx? My understanding it is not. If not, it seems to me put a ping pong ball like shell aruond the leaves and embed the leaves in a round polyurethane ball will fix those delicate angles permanently. You can bounce it if you want. :)

Re: My supercheap FPV setup for $120

Posted: Tue Mar 20, 2012 11:08 am
by erazz
Well I haven't damaged them yet... They do seem delicate but as long as you don't sit on them they are fine.


Meanwhile it works. And it's super easy to use. Just turn on and go fly.
I've now found out why you need an OSD.... Almost loosing the model on the first run :D

Re: My supercheap FPV setup for $120

Posted: Wed Jun 06, 2012 8:10 pm
by kaos
Just received my .030" mig wires, ready to get the cloverleaf antenna done. one detailed question about the length of the wire. my FPV TX/Rx has 8 ch to choose from. in the calculator IBcrazy provided, do you have to use the exact frequency you are using or an average number will work for all 8 chs?
what I am trying to ask is if you make one length based on on ch frequency will that work with other chs?

Re: My supercheap FPV setup for $120

Posted: Mon Sep 07, 2015 10:04 am
by Gcl2000
http://www.flickr.com/photos/erezraviv/6773055798/

Hi did you get a good reception with this

Re: My supercheap FPV setup for $120

Posted: Fri Nov 20, 2015 1:54 am
by kaos
These words are from IBcrazy, I can't find the link right now. You can find it at RCgroups.
The most critical part is the length of the wire, the angle is not as important.